
Why Is My Orchid Dying? 7 Real Causes and How to Fix Each One
My first Phalaenopsis died in February 2019, and I was convinced it was the plant’s fault. I’d done everything “right” watered it weekly, kept it on the windowsill, even talked to the thing. But I hadn’t checked the roots once. By the time I tipped it out of its pot, there was nothing left to save. If you’re asking why is my orchid dying, the honest answer is: it’s almost never one thing, and the most common fixes you’ll find online are often what caused the problem in the first place.
- The Real Reason Orchids Are So Easy to Kill
- Root Rot: The Silent Killer Most People Miss
- Light and Temperature Are Doing More Damage Than You Think
- Watering Mistakes That Slowly Destroy Orchids
- Quick Diagnosis: Symptom-by-Symptom Reference
- The One Thing to Do Right Now
The Real Reason Orchids Are So Easy to Kill
Orchids sold in grocery stores and garden centres are almost always Phalaenopsis moth orchids that have been nursery-grown in highly controlled conditions. Bright, indirect fluorescent light. Precise humidity. Bark mix that drains in seconds. Then they land in your living room, in a plastic pot jammed inside a decorative ceramic one with no drainage, and the clock starts ticking.
The problem isn’t that orchids are fragile. In the right conditions, Phalaenopsis orchids can live for decades and rebloom reliably year after year. The problem is that their needs are almost exactly opposite to what most people instinctively do with houseplants.
There are 7 distinct causes I’ve seen kill orchids across my collection. Most plants show more than one at once, which is why treating just one symptom rarely works.
Root Rot: The Silent Killer Most People Miss
Root rot is responsible for more dead orchids than everything else combined, and it almost always starts before you can see any above-ground symptoms. By the time the leaves go yellow or the plant collapses, the roots have been gone for weeks.
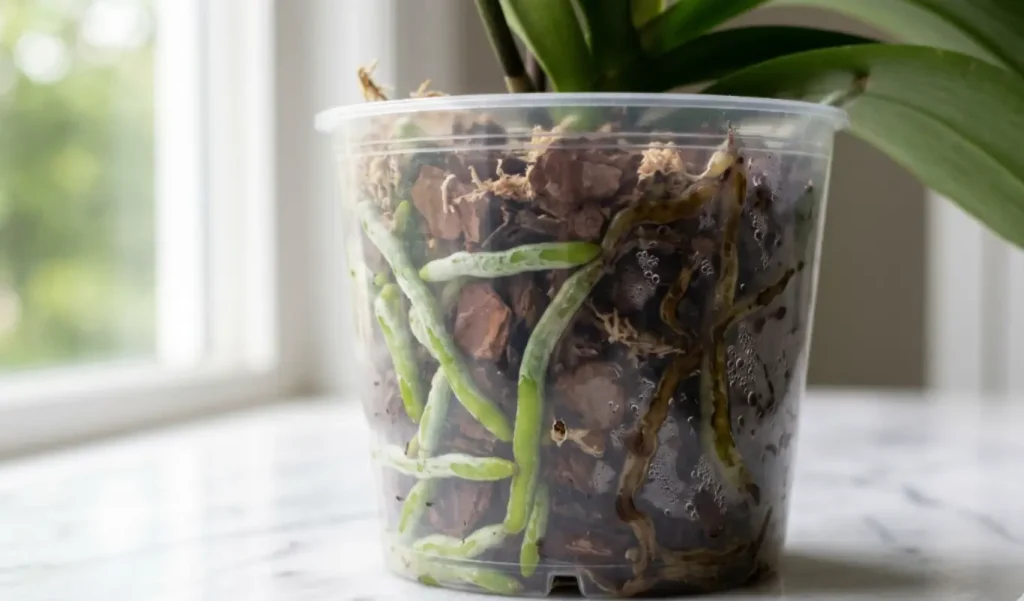
Healthy orchid roots are firm and greenish-grey when dry, bright green when freshly watered. If you pull your orchid from its pot and find brown mush, that’s rot usually caused by a combination of overwatering and poor drainage. The decorative outer pot is almost always the culprit, trapping water at the base.
Here’s what to actually do:
- Remove all dead roots immediately. Use clean scissors and cut back anything brown, soft, or hollow to where firm tissue begins. Leaving dead roots accelerates the spread of rot to healthy ones.
- Let the roots air-dry for several hours before repotting. I usually leave mine uncovered overnight. This hardens the cut ends and reduces the chance of infection taking hold.
- Repot into fresh orchid bark in a clear plastic pot. Clear pots let you see root health without disturbing the plant. Skip the decorative outer pot, or raise the inner one on pebbles so it never sits in water.
Root rot can’t be reversed only stopped. The goal isn’t to fix dead roots; it’s to protect the ones that are left.
Light and Temperature Are Doing More Damage Than You Think
Too Much Direct Sun
Phalaenopsis orchids don’t want direct sun. An hour of direct afternoon sun in summer is enough to bleach the leaves pale and cause cell damage that looks like dry, papery patches. South-facing windowsills in summer are often too intense, even with a sheer curtain.
What they actually want is bright, indirect light think east-facing windows, or a few feet back from a south or west window. The leaves should be medium green. Dark green means not enough light; pale yellowish-green means too much.
Cold Drafts and Temperature Swings
Orchids are surprisingly temperature-sensitive, not to cold temperatures in general, but to sudden changes. A plant sitting near a drafty window or an air conditioning vent can develop spotted, water-soaked patches on its leaves, then drop flowers early. I keep mine away from anything that blows, and I check the window seal in winter my old apartment had a gap that killed two plants before I figured it out.
That said, a cool night temperature around 55–60°F (13–16°C) actually triggers orchids to rebloom. So a slightly cooler windowsill in autumn isn’t a problem; it’s a feature.
Watering Mistakes That Slowly Destroy Orchids
Overwatering is the most cited cause of orchid death, and it’s true but the explanation usually stops too short. It’s not just about frequency. It’s about whether the roots ever fully dry out between waterings.
The correct method is soak-and-dry. Take the plastic inner pot to the sink, run water through the bark for about 30 seconds, let it drain completely, and don’t water again until the bark feels dry and the roots have gone from green to grey. In most homes, that’s every 7–10 days in summer, every 14 days in winter. But counting days is less reliable than checking the roots.
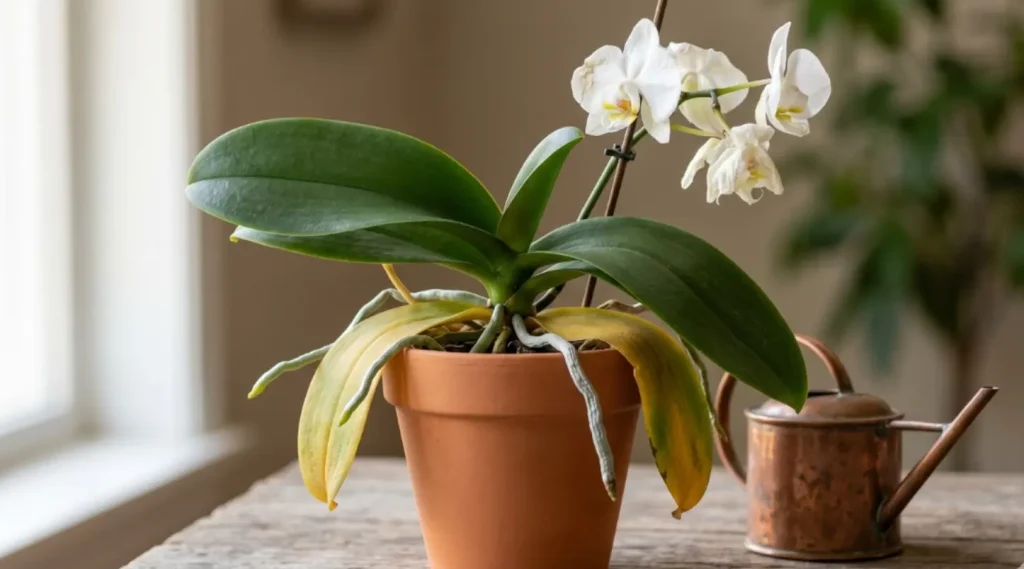
Under-watering Looks Different Than You’d Expect
An underwatered orchid won’t wilt dramatically like most plants. Instead, the leaves develop wrinkles running lengthwise they look accordion-pleated. The pseudobulbs (if your orchid has them) shrivel. Roots go silvery-white and stay that way. If this is your situation, the fix is a thorough soak, not a gradual increase in watering frequency.
The Ice Cube Myth
I’ll be direct about this: watering orchids with ice cubes is not a good method. It’s a marketing trick that originated with a specific orchid brand. Cold water damages tropical roots, and the volume delivered by three ice cubes per week is often insufficient. Use room-temperature water, and use enough of it to saturate the bark fully.
For a deeper look at caring for orchids indoors, including humidity and fertilising schedules, that guide covers the full picture.
Other Causes Worth Checking
Beyond water and light, four more issues kill orchids with some regularity:
- Wrong potting mix. Regular potting soil suffocates orchid roots. Orchids are epiphytes in nature, their roots grip bark and get air on all sides. They need chunky orchid bark or a bark-perlite blend, not dense soil. The RHS orchid growing guide covers media options in detail.
- Fertiliser burn. Orchids are light feeders. A balanced orchid fertiliser at quarter-strength, applied monthly during active growth, is plenty. Full-strength fertiliser builds up salt in the bark and burns roots from the inside out.
- Pests hiding at the base. Scale insects and mealybugs often colonise the junction between the leaves and the stem a spot most people never check. Look for white cottony residue or small brown bumps. Treat with 70% isopropyl alcohol on a cotton swab, applied directly.
- Crown rot. Water sitting in the central crown the point where the leaves emerge causes a particularly fast-moving rot. After watering, shake or blot water from the crown. If rot has already set in, you’ll see the centre leaves going soft and darkening at the base.
And if your orchid has finished flowering but otherwise looks healthy, that’s not death that’s just dormancy. Check my guide on how to care for orchids after they bloom before you throw anything away.
Quick Diagnosis: Symptom-by-Symptom Reference
Use this table to match what you’re seeing to the most likely cause and first action.
| Symptom | Most Likely Cause | First Action |
|---|---|---|
| Yellow leaves (lower) | Natural ageing OR overwatering | Check roots firm = normal, mushy = rot |
| Yellow leaves (all over) | Root rot or too much direct light | Unpot immediately and inspect roots |
| Wrinkled, pleated leaves | Underwatering or severe root loss | Soak thoroughly; check if roots can absorb |
| Pale, bleached patches | Sunburn | Move away from direct light immediately |
| Spotted, water-soaked patches | Cold draft or bacterial infection | Move away from vents/windows; remove affected leaves |
| Soft, dark crown | Crown rot | Remove rotted tissue; allow to dry; apply cinnamon as natural antifungal |
| White cottony residue | Mealybugs | Treat with isopropyl alcohol on cotton swab |
| Flowers dropping early | Temperature shock or ethylene gas (near fruit) | Move away from fruit bowl and drafts |
The One Thing to Do Right Now
Take your orchid out of its pot. Not next week now. The most important information is underground, and you can’t get it through the plastic. Look at the roots: their colour, their firmness, how much of the system is still viable. Everything else watering schedule, light position, fertiliser is secondary to knowing what you’re actually working with.
If most of the roots are still healthy, you’re in good shape. Trim the dead ones, repot in fresh bark, put it in bright indirect light, and water only when the bark is dry. That fixes the majority of cases. If the root system is mostly gone, it’s a harder road but it’s not necessarily over. A single healthy root and a firm crown is enough to work with.
Don’t guess. Look at the roots first, then decide what your orchid actually needs.