Small Cactus Care: The Honest Guide to Keeping Yours Alive and Thriving
Most people don’t kill their small cactus through neglect they kill it with kindness. I know because I did exactly that with my first Mammillaria. I watered it every few days, misted it for good measure, and gave it a spot on my kitchen shelf that felt bright enough to me. Six weeks later it was soft, yellow, and rotting at the base. That one death taught me more about desert plants than any care guide I’d read before. The truth is, these are not forgiving plants in the way people assume they’re forgiving about being ignored, but shockingly unforgiving if you treat them like a tropical houseplant.
What Small Cacti Actually Need (Versus What Most People Give Them)
Before getting into specifics, it helps to reset expectations. A cactus is not a fern that prefers dry conditions. It’s a plant that evolved over millions of years in environments where rain might come twice a year, where soil drains in seconds, and where the sun is relentless. Everything about how you care for one should be filtered through that lens.
The biggest mistake I see among new cactus owners and something I did myself for the first year is applying “houseplant logic” to them. That means watering on a regular schedule, keeping them in rooms with moderate indirect light, and checking the topsoil for dryness before watering. For a pothos, that’s fine. For a cactus, that routine is a slow death sentence.
Here’s the mindset shift that made everything easier for me: your job with a small cactus is mostly to not do things. Don’t water too often. Don’t put it in low light. Don’t use regular potting soil. Don’t mist it. Once you’ve got the setup right, the main skill is restraint.
Knowing When to Water and When to Keep Walking
Water is where most people go wrong, so I want to spend real time here. The standard advice is “let the soil dry out between waterings,” but that’s not specific enough. For a small cactus, the soil shouldn’t just feel dry at the surface it should be completely, bone-dry all the way to the bottom of the pot. I use a bamboo skewer and push it down to the drainage hole. If it comes out with any soil clinging to it, I walk away and check again in a few days.
The method I’ve used for years on my collection is what most people call “soak and dry.” When I do water, I water deeply pouring until it drains freely from the bottom. Then I do nothing until the soil is completely dry again. During spring and summer, that might be every two to three weeks. In winter, I often go six to eight weeks without watering at all. A cactus shriveled from thirst is recoverable. One sitting in soggy soil for two weeks usually isn’t.
One scenario I run into constantly: someone has their cactus in a glazed ceramic pot with no drainage hole because “it looked perfect” on the shelf. If that’s you, please repot it. No drainage hole means water sitting at the bottom with nowhere to go, and root rot is only a matter of time. This is one situation where function has to win over aesthetics.
Watch for these signs your watering is off:
- Yellow, mushy, or translucent areas especially at the base almost always mean overwatering. Act quickly: unpot the plant, check the roots, and cut away anything black or soft before repotting in fresh dry mix.
- Shriveling or a slightly deflated look is a sign of underwatering. This is the easier problem to solve give it a thorough drink and it’ll usually plump back up within a day or two.
- Rot spreading from the base upward is a serious situation, but not always fatal. Cut above the rot into healthy tissue, let the cut callus over for several days, and replant the healthy section.
Light: How Much Is Actually Enough
Most small cacti need at least four to six hours of bright light per day, and the quality of that light matters. A spot that feels sunny to you might be far dimmer than what a cactus is used to. Our eyes adapt quickly; a cactus’s physiology doesn’t.
In my home, the south-facing windowsill is prime real estate, and I reserve it almost exclusively for cacti and succulents. East-facing windows work well for gentler morning light. West-facing windows can work but watch for afternoon intensity scorching plants that haven’t been gradually acclimated.
The counterintuitive part about cactus light is this: the glass in your window filters out a significant portion of UV light, which means even a cactus sitting directly on a south-facing windowsill is getting less light than it would outdoors. If yours is a few feet back from the window, that light drops off dramatically. This is why I added a small Barrina LED grow light above my winter setup it’s been the single biggest improvement I made to my cactus shelf.
Etiolation is what happens when a cactus doesn’t get enough light it stretches upward looking pale, thin, and elongated, reaching toward whatever light source it can find. It won’t reverse (the stretched part stays stretched), but move it to better light and all new growth will come in compact and healthy.
Getting the Foundation Right: Soil and Pots
Think of the soil and pot as the environment your cactus lives in every single day. If you get these wrong, nothing else matters much. I’ve seen people give their cacti perfect light and perfect watering but still lose them because they used regular potting mix and a decorative pot with no drainage.
The Soil That Actually Works
Standard potting soil is designed to retain moisture which is great for most houseplants and completely wrong for desert cacti. You need something gritty, coarse, and fast-draining. Commercial cactus and succulent mixes are a decent starting point, but I find most of them still hold too much moisture on their own. My go-to for my collection is mixing a store-bought cactus mix 50/50 with perlite. It drains fast, dries out quickly, and I’ve had far fewer rot problems since switching.
If you prefer to mix your own, a reliable recipe is two parts regular potting soil, one part perlite or pumice, and one part coarse sand or fine gravel. The goal is soil that water passes through in a few seconds you should be able to pour water in and watch it drain out the bottom almost immediately.
Picking the Right Pot
Two rules that I won’t bend on: the pot must have a drainage hole, and for beginners, terracotta is almost always the better choice. Unglazed terracotta is porous, which means moisture evaporates through the walls giving you an extra buffer if you accidentally water a little too generously. Glazed ceramic or plastic pots hold moisture much longer, which leaves less room for error.
When it comes to size, go snug rather than spacious. A pot much larger than the root ball holds excess soil that stays wet long after the cactus has drunk what it needs. I typically move up only one pot size when repotting.
How to Repot Without the Pain
The most common repotting mistake I see is people grabbing the cactus directly with their hands and immediately regretting it. My approach: fold a thick piece of newspaper into a band, wrap it around the body of the cactus, and use the ends as handles. For very small specimens, kitchen tongs work well. Once you’ve lifted it out, gently tease the old soil from the roots before setting it into fresh cactus mix. Let it settle for a week before watering.
Temperature, Humidity, and the Winter Rest Period
Most small cacti do well at typical indoor temperatures anywhere from 65–85°F (18–29°C) during the growing season is comfortable for common genera like Mammillaria or Rebutia. What people miss is the winter side of the equation.
A proper dormancy period somewhere around 45–55°F (7–13°C) with very little water from late autumn through winter isn’t just about keeping the plant alive. It’s often the key to getting blooms. I moved my cacti to an unheated spare bedroom one winter just to experiment. The following spring, three of them flowered for the first time in two years. The cool rest triggers bud development in a way that a cozy, evenly-heated indoor environment never does.
On humidity: keep it low. These are desert plants, and the average home in a humid climate is already pushing the upper edge of what they prefer. Misting a cactus which I still see recommended in some older guides is one of the worst things you can do. It leaves moisture sitting on the plant’s surface, which invites fungal problems and leaves mineral deposits from tap water. Good air circulation around your cacti does far more good than any misting ever could.
Feeding: Less Than You Think, More Carefully Than You’d Expect
Fertilizer is genuinely optional for cacti, but used correctly it can push a healthy plant toward stronger growth and, with the right formula, flowering. The key word is “correctly.”
Standard all-purpose fertilizers are too high in nitrogen, which pushes rapid, soft, watery growth exactly the kind that’s prone to rot and pests. For cacti, you want a fertilizer with low nitrogen and higher phosphorus and potassium. Look for an N-P-K ratio like 2-7-7 or 5-10-10. I’ve been using Schultz Cactus Plus for years; it’s inexpensive, easy to find, and has the right ratio.
Feed only during the active growing season roughly spring through summer. Once a month, diluted to half the strength listed on the package, applied to already-moist soil (never dry). Stop completely in autumn. Feeding a dormant cactus is a pointless risk.
Common Problems and What They Usually Mean
Most issues with small cacti come back to the same handful of causes. Here’s how I diagnose quickly:
- Yellow coloring with soft texture almost always points to overwatering or root rot. Stop watering immediately, check the roots, and repot in fresh dry mix if you find any blackening or mushy roots.
- White cottony spots in crevices are mealybugs. Dab each one with a cotton swab dipped in 70% isopropyl alcohol. Check back in a few days because eggs often survive the first pass.
- Fine webbing and a dusty look suggests spider mites. A strong spray of water knocks most of them off; for persistent infestations, neem oil or insecticidal soap applied in the evening works well.
- White, yellow, or brown dry patches on one side of the plant are usually sunburn, especially if you recently moved the plant into more intense light without a gradual transition. Shade it briefly and acclimate slowly.
- Stretching, pale, elongated growth means not enough light see the etiolation section above.
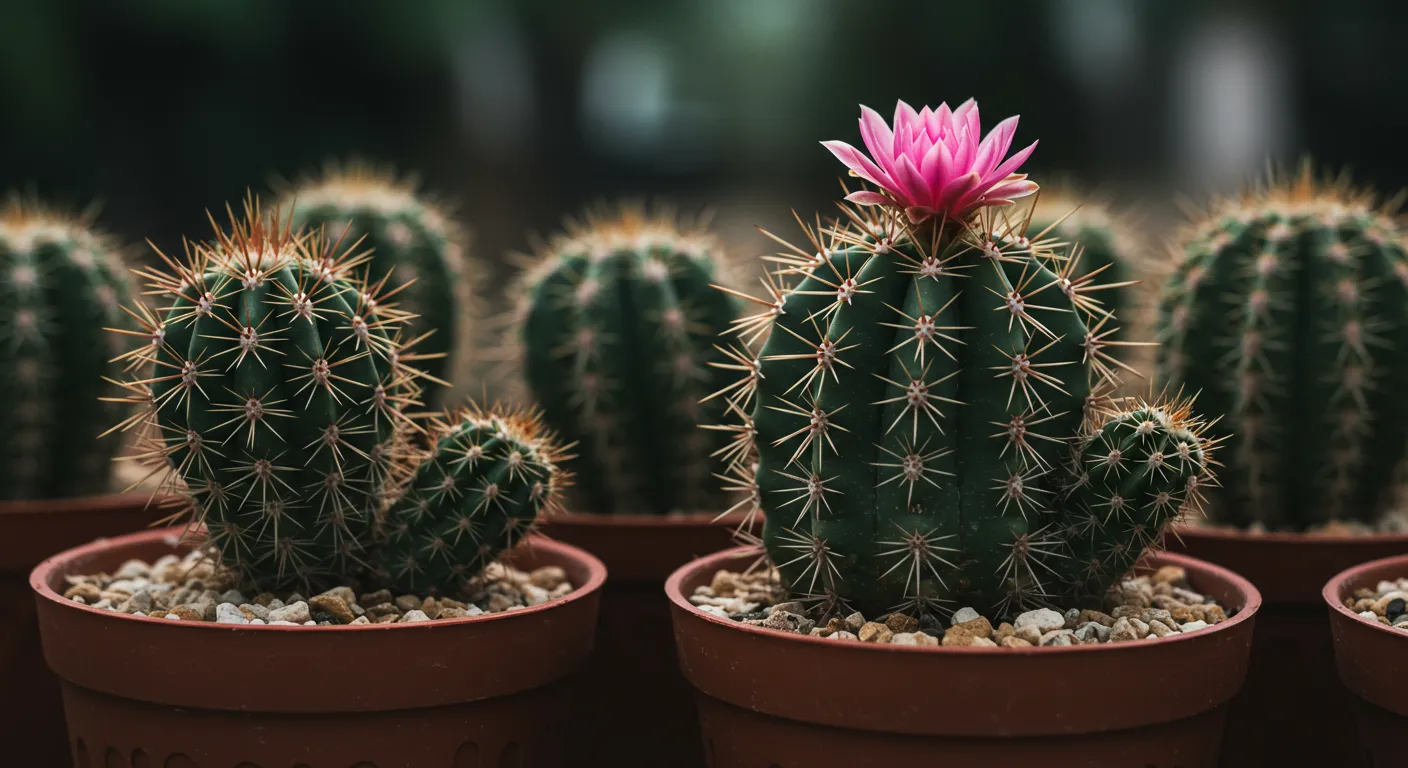
Getting Your Cactus to Flower
A flowering cactus is one of the most disproportionately exciting things in my plant collection. These small, often modest-looking plants can produce blooms that are shockingly vivid electric pinks, deep oranges, clean whites. But they won’t flower just because you’re watering correctly. They need two things: the right dormancy conditions and enough light to build energy reserves.
The dormancy piece is what most people skip. Move your cactus somewhere cooler in late autumn, reduce water to the bare minimum (once a month or less), and stop fertilizing entirely. Come spring, gradually reintroduce warmer temperatures, more frequent watering, and monthly feeding with a low-nitrogen, bloom-promoting fertilizer. That seasonal shift is usually what finally unlocks flowering in plants that have been stubbornly green for years.
If your cactus has never flowered and you’ve had it for several years, it may simply be too young many species don’t flower until they reach a certain maturity. Patience is a real part of this. Also, if you’re growing something like a Christmas or Thanksgiving cactus, the flowering triggers are slightly different; those operate on day-length cues rather than temperature alone. I cover that in more detail in the Christmas cactus care guide if you have one of those.
When flowers do appear, leave the spent blooms alone. They’ll dry up and fall off on their own. Cutting or pulling them creates an open wound in the areole which is an invitation for rot.
The One Thing Worth Remembering
If you take nothing else from this guide, take this: the most common reason a small cactus dies is water. Not insects, not cold temperatures, not bad soil water. More specifically, too much of it, too often, in a pot that doesn’t drain fast enough.
Get the watering right using the soak-and-dry method, checking deep into the soil before touching the watering can, and cutting back almost entirely in winter and you’ll have solved 80% of the problems people come to me about. Everything else is refinement. These plants are genuinely tough; they just need you to resist the urge to fuss over them.