Small Colorful Cacti: What They’re Actually Called and How to Keep Them Alive
Most people kill their first colorful cactus not from neglect but from too much care. I did exactly that. I brought home a gorgeous little Moon Cactus about eight years ago, placed it in my sunniest window, watered it every week because “it looked like it needed it,” and watched it turn to mush within two months. The thing is, I already had 50+ plants at that point. I just assumed cacti worked like everything else. They don’t.
If you’ve recently picked up one of those bright, almost-candy-colored little cacti and you’re wondering what it is and how not to kill it this is the guide I wish I’d had. We’ll go through the most common small colorful cacti with their names, where that color actually comes from, and the care principles that genuinely matter.
Where the Color Comes From: Natural vs. Artificially Dyed Cacti
Before anything else, you need to know whether your cactus’s color is real or painted on. This isn’t a small detail it affects how you care for it and what to expect long-term.
Cacti That Are Naturally That Colorful
Some small cacti come by their color honestly, through genetics, spine pigmentation, or a fascinating biological quirk. These colors are permanent and won’t grow out or fade with good care.
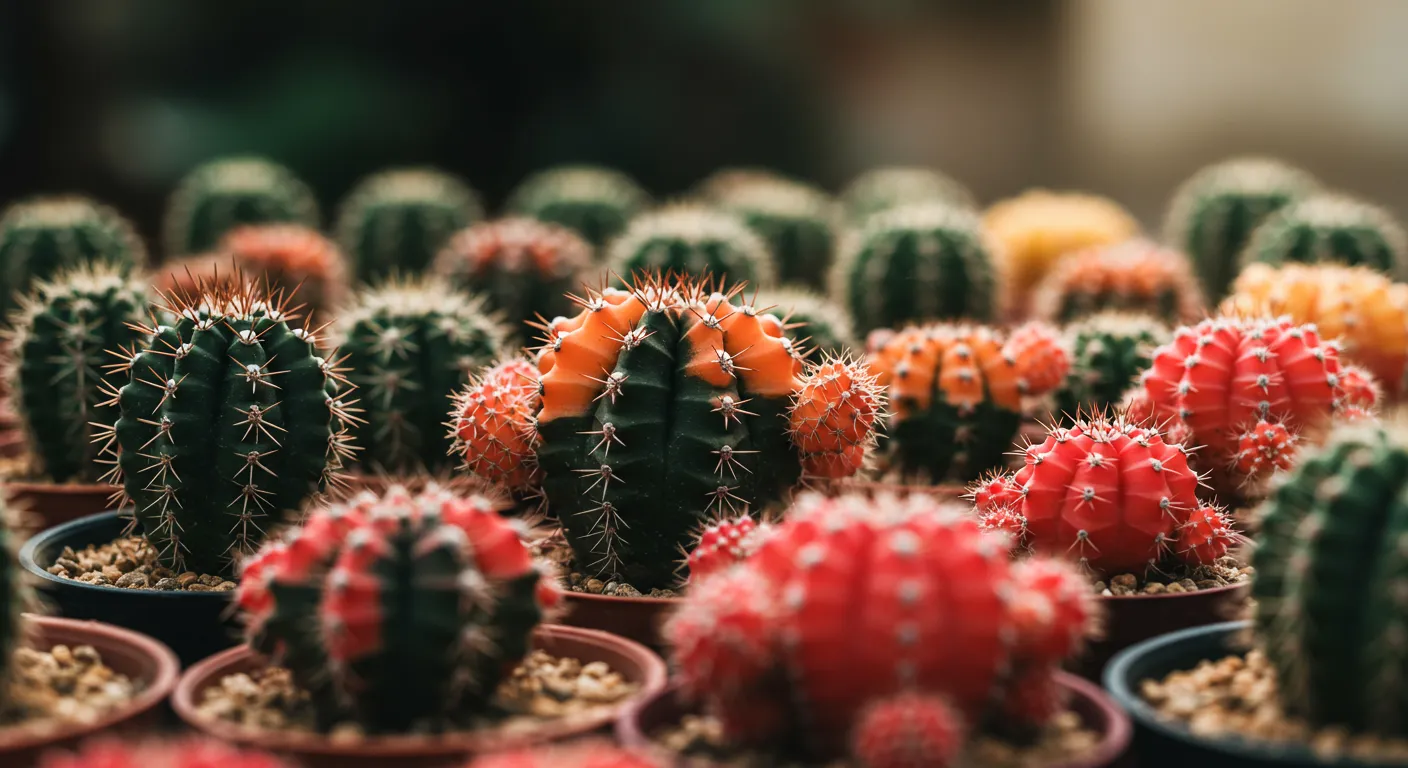
- Moon Cactus (Gymnocalycium mihanovichii): The iconic hot-pink, red, or yellow ball you see everywhere. Here’s what most people don’t realize that colorful top is actually a mutant cactus that produces zero chlorophyll. It can’t survive on its own, so it’s grafted onto a green rootstock (usually Hylocereus) that feeds it. You’re essentially looking at two cacti in one pot.
- Copper King Ladyfinger (Mammillaria elongata ‘Copper King’): The body is green, but it’s covered so densely in warm coppery-orange spines that it glows like a little torch in morning light. I have three of these on my east-facing windowsill and they’re some of the most underrated plants in my collection.
- Blue Myrtle Cactus (Myrtillocactus geometrizans): A genuinely blue-green cactus that color is a natural waxy coating on the skin. As a small plant it looks almost alien, and it stays manageable in a pot for years before it gets tall.
- Star Cactus (Astrophytum asterias): Pale green to silver-grey with white flocking that looks like it was dusted in sugar. No paint involved that’s just how it grows. A slow grower but one of the most striking small cacti available.
The Spray-Painted Ones (Yes, Really)
Walk into any big-box garden center and you’ll see neon orange, electric blue, and hot-pink cacti that look like they belong in a candy shop. Many of these are common Mammillaria or Echinopsis species that have been spray-painted or dipped in dye to boost sales. The color will never spread or deepen it’ll slowly get pushed down as the plant grows new tissue from the top.
The real concern is that paint can clog the stomata (the tiny pores the plant uses to breathe and photosynthesize). Some painted cacti struggle more than others depending on how thick the coating is. If you already own one, don’t try to wash or scrape it off you’ll damage the skin. Just give it good care and let the natural growth take over. Within a year or so, you’ll see healthy green tissue emerging from the crown and the painted section will be lower on the stem.
The counterintuitive truth here: a dyed cactus isn’t necessarily doomed. It’s more resilient than you’d think, as long as you nail the basics.
Light, Water, Soil: Getting the Fundamentals Actually Right
These three things are where the majority of small colorful cactus care either succeeds or falls apart. And at least one of them is probably the opposite of what you’d guess.
Sunlight Bright, But Not Always Direct
Here’s the thing people get wrong: not all small cacti want to bake in full southern sun. Especially grafted Moon Cacti the colorful top has no chlorophyll to protect it and scorches easily. I learned this the embarrassing way when I moved a Moon Cactus outdoors for summer and came back to a bleached, crispy top.
Most small colorful varieties do best with bright indirect light or gentle morning sun from an east-facing window. Aim for around six hours of good light per day. Signs of too much sun: bleached patches, papery brown scarring, or the top half looking faded. Signs of too little: the plant starts stretching upward in a thin, desperate column this is called etiolation, and once it happens you can’t reverse it.
If your space doesn’t get great natural light, a basic grow light like the Barrina T5 (what I use in my basement setup) on a 12-hour timer will keep most small cacti genuinely happy.
Watering The Soak-and-Dry Method, Done Properly
Overwatering is far and away the most common way people lose their first cactus. The fix isn’t just “water less” it’s about how you water, not just frequency.
When it’s time to water, drench the soil thoroughly until water runs out the drainage hole. Then leave it completely alone until the soil is bone dry, all the way through not just on the surface. I use a wooden chopstick pushed two inches into the soil. If it comes out clean with no soil sticking to it, I water. If there’s any moisture at all, I wait a few more days.
In summer, depending on your climate and pot size, that might mean watering every 10–14 days. In winter dormancy, some of my cacti go six weeks between waterings and they’re fine. The plant’s appearance matters more than a schedule: a very slightly soft, wrinkled skin means it’s thirsty; mushy, discolored, or darkening tissue means it’s been sitting in too much water.
Soil Mix This One Is Non-Negotiable
Standard potting mix holds moisture like a sponge. For a cactus, that’s a slow death sentence. You need something that drains almost immediately and dries out fast.
I use a commercial cactus mix as a base I’ve had good results with Espoma Cactus Mix and I cut it roughly 50/50 with perlite. That extra perlite is what makes the difference between soil that dries in three days versus ten. If you want to DIY it entirely, a simple blend works well:
- One part regular potting soil: Just enough organic matter to hold some nutrients without trapping water.
- One part perlite: This is the real workhorse it creates air pockets and keeps roots from drowning.
- One part coarse sand or fine gravel: Adds weight and mimics the gritty desert substrate these plants evolved in.
Also: always use a pot with a drainage hole. I know ceramic pots without holes look beautiful. Buy them anyway and drop a nursery pot inside. Don’t sacrifice drainage for aesthetics.
Dormancy and Feeding: What Most Beginner Guides Skip Over
Once you’ve got the basics dialed in, understanding the cactus growth cycle is what separates plants that just survive from plants that actually thrive and bloom.
Why Dormancy Matters (And How to Not Ruin It)
Most small cacti go dormant in fall and winter. Growth slows or stops completely. This isn’t a problem it’s a feature. But the instinct when you see a plant doing nothing is to start troubleshooting: more water, maybe some fertilizer, a brighter spot. Resist all of that.
During dormancy, cacti need to be kept cool (ideally around 50–55°F / 10–13°C), dry, and left mostly alone. Watering once every four to six weeks is plenty for genera like Mammillaria and Rebutia. Stop fertilizing entirely. This cool, dry rest period is actually what primes the plant to bloom in spring skip it and you might get healthy green growth but no flowers.
I move a few of my smaller cacti to an unheated spare room each November. It feels a little cruel, honestly, but they come out in March looking better than ever and covered in buds.
Feeding During the Growing Season
Cacti don’t need much fertilizer, but a light feeding during spring and summer does make a noticeable difference particularly for encouraging blooms and keeping the plant’s color vivid.
- Use a cactus-specific formula: These are low in nitrogen (which pushes leafy green growth at the expense of flowers) and higher in phosphorus and potassium, which support root health and blooming.
- Always dilute more than the label says: I go to quarter strength. Cactus roots are sensitive and fertilizer burn is easy to do. Under-feeding does almost nothing; over-feeding causes real damage.
- Timing: Once every four to six weeks from April through August. That’s it. Stop completely by September.
When Something Goes Wrong: Reading What Your Cactus Is Telling You
Even when you’re doing everything right, problems happen. Here’s how to diagnose the most common ones without spiraling into panic-repotting mode.
Yellow, Mushy, or Soft Tissue
Nine times out of ten, this is overwatering. The roots are waterlogged and beginning to rot, which means the plant can’t take up nutrients. The tissue goes soft and yellowish, sometimes with a slightly translucent look.
Catch it early and you can often fix it: stop watering immediately, let the soil dry completely, and improve drainage going forward. If the base of the cactus is already brown and mushy, you may need to perform emergency surgery cut away everything healthy above the rot, let the cut surface callus over for a few days in dry air, then replant into fresh dry mix. It sounds dramatic but it works more often than you’d expect.
If the yellowing looks dry and faded rather than soft and mushy, that’s more likely sun damage or less commonly severe underwatering over a long period.
White Fuzzy Spots in the Crevices
That’s mealybugs. They’re common, annoying, and entirely manageable if you catch them early. The fluffy white coating is a waxy protective layer they produce.
Isolate the plant immediately mealybugs spread fast. Then dab each visible bug with a cotton swab dipped in 70% isopropyl alcohol. Check back every three or four days and repeat. For a heavy infestation, a diluted neem oil spray works well as a follow-up treatment. The key is persistence one treatment rarely gets them all.
Stretched, Thin, Leaning Growth
This is etiolation: the plant is reaching for more light. It’s not reversible you can’t shrink the stretched section back down. But you can stop it from continuing by moving the cactus to a brighter spot. If the shape really bothers you, you can behead the cactus, let both pieces callus, and propagate the healthy top. It’s a bit of a commitment but it resets the plant’s form nicely.
Getting Your Cactus to Bloom Again
The first time a cactus flowers in your care feels disproportionately satisfying. Small species like Rebutia and Mammillaria can produce a ring of flowers around their crown that looks almost too good to be true. Here’s how to set the stage for that.
The Dormancy-Bloom Connection
The single biggest lever for encouraging blooms is honoring the winter rest period described above. Cool temperatures and dry conditions through fall and winter are the biological trigger for flowering. When spring arrives and you start watering again and move the plant back to a warm, bright spot, you’re essentially mimicking the seasonal shift from dry season to wet season and the plant responds by flowering.
Once you see buds forming, switch to a low-nitrogen “bloom booster” fertilizer every two to three weeks and make sure the plant is getting maximum light. Don’t rotate the pot once buds appear cacti are sensitive to changes in light direction during budding and may drop their flowers if you move them.
If you want more detail on this process, our guide on caring for desert cacti goes deeper into species-specific bloom triggers and timelines.
Common Questions Worth Answering Directly
How Often Should I Repot?
Less often than you think. Cacti are slow growers and they genuinely don’t mind being slightly root-bound. In fact, a snug pot often encourages flowering. Plan to repot every two to four years, and only move up one pot size at a time (about 1–2 inches wider in diameter). A pot that’s too large holds too much soil, which holds too much moisture, which you guessed it leads to rot.
Repot when roots are visibly escaping the drainage hole, when the plant is clearly unstable and leaning, or when water just rushes straight through the soil without being absorbed (a sign the mix has broken down and compacted).
Can These Go Outside?
Many can, but acclimate slowly. Moving a cactus from a windowsill to full outdoor sun in one step will cause sunburn white or tan scarred patches that won’t heal. Start with a shaded spot outdoors for a week, then gradually increase sun exposure over two to three weeks. Bring them back in before the first frost unless you’re growing frost-hardy species.
My Moon Cactus Seems to Be Splitting Apart at the Graft Is That Normal?
Sometimes the grafted join between the colorful top and the green rootstock can fail, especially if the rootstock outgrows the top or if there’s been water damage. If the top feels loose, try re-grafting it onto a fresh, healthy rootstock there are good tutorials for this online. If the rootstock dies but the colorful top is still firm and healthy, it unfortunately can’t survive on its own since it has no chlorophyll. That’s the biological trade-off of this particular plant.
The One Thing That Makes the Biggest Difference
If there’s a single habit worth building with small colorful cacti, it’s this: check the soil before you water, every single time. Not on a schedule. Not because it’s been two weeks. Actually stick your finger or a chopstick into the mix and verify it’s dry. It sounds simple to the point of being obvious, but it’s the practice that would have saved my first Moon Cactus and probably a dozen plants since then. Get that right and almost everything else becomes forgiving.