If you have grown orchids for any length of time, you have almost certainly stared at those thick, silvery tendrils escaping over the rim of the pot and asked yourself: should I do something about these? I asked the same question when I first started growing Phalaenopsis on a windowsill in a climate that is about as far from a tropical forest as you can get. The answer, once I understood the biology behind them, changed everything about how I care for my plants.
This guide covers orchid aerial roots from the ground up what they are, what their appearance is telling you about your plant’s health, when (and how) to trim them, and how to manage them during repotting. By the end, you will stop seeing these roots as a problem and start reading them as one of the most informative health signals your orchid has.
What Orchid Aerial Roots Actually Are
To understand why orchid aerial roots behave the way they do, you need to understand where orchids come from. The vast majority of popular houseplant orchids Phalaenopsis, Cattleya, Dendrobium, Oncidium are epiphytes. In the wild, they do not grow in soil. They anchor themselves to tree branches and bark, exposing their root systems to open air, dappled light, and the intermittent drenching of tropical rainfall.
Because these roots evolved to operate outside of any growing medium, they developed a remarkable tissue called velamen radicum commonly shortened to velamen. Velamen is a multi-layered, sponge-like epidermis of dead, hollow cells that sheathes the root. Its job is threefold: it absorbs water and dissolved nutrients almost instantaneously when moisture is available, it insulates the living root tissue from temperature extremes, and crucially it reflects light, which helps prevent the root from overheating in exposed positions.
When a root ventures outside the pot entirely, growing through the air rather than into the potting medium, we call it an aerial root. This is not a sign that your orchid is stressed or pot-bound. It is the plant doing exactly what its biology was designed to do. Trying to suppress or eliminate aerial roots is working against the plant’s nature.
What Your Orchid’s Aerial Roots Are Telling You
Aerial roots are one of the most readable health indicators on the entire plant, if you know the code. For a quick reference: what your orchid’s roots are telling you, bookmark that page alongside this one. Here is the full diagnostic breakdown:
Root Appearance
What It Means
Action Required
Bright green tip, white/silver body
Actively growing, healthy, well-hydrated velamen
None leave it completely alone
Fully silver-white, firm when pressed
Dry but alive velamen cells are empty, waiting for moisture
Increase watering frequency or ambient humidity
Plump white/green throughout
Recently watered; velamen fully saturated
None this is the target state after watering
Tan or straw-coloured, firm
Older but still functional root
None unless structurally compromised
Brown or black, mushy
Root rot fungal or bacterial decay
Remove with sterile tool; address watering and drainage
Dry, shrivelled, string-like
Dead velamen and inner cortex both desiccated
Can be removed; will not recover
White with flat, papery texture
Healthy but dormant common in winter or low-light periods
Maintain current care; will resume growth in better conditions
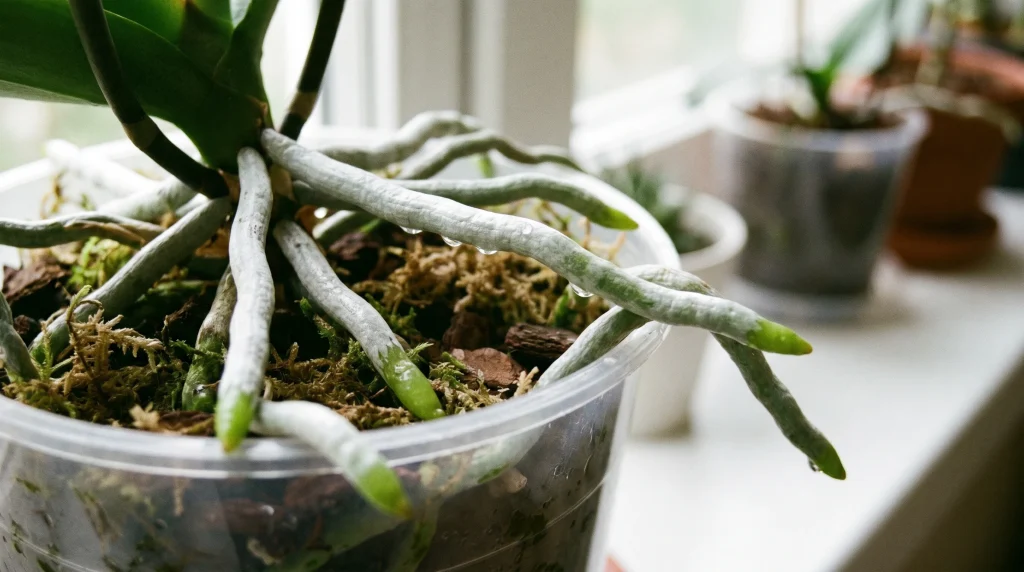
The single most important distinction to internalise is the difference between dry and alive versus dead. A dry, silver root is not a dead root. Press it gently between two fingers: if it offers resistance and springs back even slightly, it is alive. If it collapses like tissue paper with no resistance at all, it has lost its internal structure and is gone.
The Golden Rule: Do Not Cut Healthy Aerial Roots
Never cut a living aerial root. I cannot state this clearly enough, and it is the single mistake I see most often from new orchid growers. Every healthy root, whether it is growing inside the pot or waving in the air above it, is performing active metabolic work: absorbing moisture from humidity, photosynthesising through its chloroplast-containing cortex cells (yes, orchid roots photosynthesize), and storing carbohydrate reserves the plant draws on during stress.
Removing a healthy root does three specific kinds of damage:
It reduces total photosynthetic capacity. Each root contributes to the plant’s energy budget. Fewer roots means less energy for blooming.
It creates an open wound. The cut surface is an entry point for Fusarium wilt, bacterial rots, and other pathogens. Even a clean cut in a healthy plant can trigger crown rot if the wound gets wet before it calluses over.
It signals to the plant that something is wrong. Orchids respond to root loss by diverting resources away from flowering and into emergency root regeneration. You may wait an extra season for blooms as a result.
The instinct to tuck aerial roots back into the pot is equally misguided. Forcing a root that has hardened in open air back into a confined, humid growing medium almost always causes it to rot. The velamen was conditioning itself to atmospheric moisture absorption, not substrate moisture and the transition kills it. Leave aerial roots where they grew.
When It Is Appropriate to Cut Orchid Aerial Roots
There is exactly one category of aerial root that warrants removal: roots that are confirmed dead or actively rotting. Here is how I approach this cleanly and safely.
How to Identify Roots That Need Removal
Brown or black colouration extending beyond the tip into the main body of the root
Mushy texture that collapses under light pressure
Foul or fermented smell emanating from the root
Roots that are completely desiccated shrivelled to a thread with no internal firmness at all
Step-by-Step Root Removal Process
Sterilise your cutting tool. Use sharp, narrow-blade scissors or a scalpel. Wipe the blade with 70% isopropyl alcohol and allow it to dry completely. Never skip this step reusing an unsterilised blade between plants is how fungal infections spread.
Make the cut at the base, as close to the point where the root meets healthy tissue as possible. Do not leave a stub; stubs harbour pathogens.
Treat the wound immediately with powdered cinnamon, activated charcoal, or a commercial orchid wound sealant. These are antifungal and desiccating. Avoid petroleum-based products.
Allow the cut surface to callus in a dry location for at least 30 minutes before watering or misting the plant.
Dispose of removed roots in the bin, not the compost. Dead orchid roots can harbour the same pathogens that killed them.
Sterilise your tool again after the job is done, before using it on any other plant.
A note on browning tips specifically: A small amount of brown at the very tip of an otherwise healthy, firm root is normal and not a cause for removal. Tip browning can result from fluoride in tap water, low humidity, or the root having touched a dry surface. It does not indicate systemic rot. Judge the root by its body, not its tip.
Orchid Aerial Roots Outside the Pot: Should You Be Worried?
Seeing orchid aerial roots outside the pot in significant numbers is one of the most common reasons growers go looking for advice. In most cases, it is not a problem it is simply a characteristic of how the plant grows. However, a large volume of aerial roots can sometimes be a signal worth interpreting.
If your orchid has been in the same pot for three or more years and the majority of its root system is now aerial, it may be pot-bound and the medium may have broken down. Bark, moss, and other orchid substrates decompose over time and stop providing adequate aeration to the roots inside. When roots find the medium suffocating, they escape upward and outward to reach air. In this case, repotting is appropriate but the aerial roots themselves are not the problem, the degraded medium is.
Conversely, if your orchid was recently repotted and is already producing abundant aerial roots, this is a sign of excellent health and a vigorous plant. signs your orchid is healthy and thriving
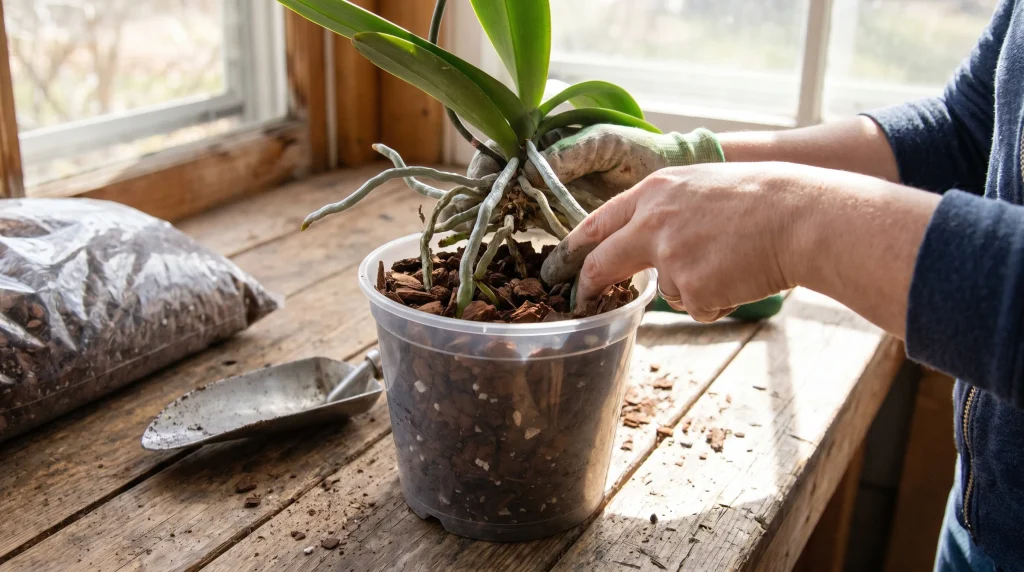
Managing Orchid Aerial Roots During Repotting
Repotting is the moment when most root damage occurs, and the damage is almost always avoidable. Here is what I have learned from repotting hundreds of orchids over the years.
Preparation: Hydrate Before You Repot
Water your orchid thoroughly the day before repotting. Hydrated roots are flexible and dramatically less likely to snap. Dry roots are brittle and will break when you try to manoeuvre them. This single step prevents the majority of root injuries during repotting.
The Coiling Technique for Long Aerial Roots
Long aerial roots that cannot be directed naturally into a new pot should be coiled, not forced. Hold the root near its base and gently guide it into a loose spiral, working slowly and following the root’s natural resistance. If it resists at any point, stop and try a slightly larger radius. A coiled root placed loosely in the new pot will eventually orient itself; a snapped root is simply a wound.
Roots that absolutely will not bend particularly older, lignified roots should be left to remain aerial rather than broken. It is always better to have an aerial root than a rot-inviting wound.
What Never to Do During Repotting
Never pull the root system out of an old pot by force. If the roots are attached to the pot wall, cut the pot away with scissors rather than tearing the roots free.
Never cram aerial roots into a pot that is too small for them. Size up if necessary.
Never repot immediately after a severe temperature change. Roots are under stress and will not recover as quickly.
Optimising Your Environment for Healthy Aerial Roots
The condition of aerial roots is directly tied to the ambient conditions around them. Velamen that is perpetually parched will shrivel; velamen that is never allowed to dry will rot. The target environment mirrors as closely as practical the conditions of a tropical forest canopy.
Humidity: The Most Important Variable
Aim for 50–70% relative humidity around your orchids. Below 50%, aerial roots desiccate rapidly and the velamen becomes permanently damaged. Above 70% without adequate airflow, the risk of fungal and bacterial issues increases significantly. A digital hygrometer costs very little and removes all guesswork from this equation.
In low-humidity homes particularly during winter when central heating dries indoor air there are several practical strategies:
Pebble trays with water placed beneath (not touching) the pot create a localised humidity zone through evaporation.
Grouping orchids together raises the collective humidity in their immediate microclimate through transpiration.
A small ultrasonic humidifier near your orchid shelf is the most effective solution in very dry climates.
Misting: Use It Correctly or Not at All
Misting aerial roots is beneficial if done correctly. Mist in the morning so that moisture evaporates fully before cooler evening temperatures arrive. Never mist the crown (the central growing point) of a Phalaenopsis water pooling there is the leading cause of crown rot. Direct the mist toward the roots and leaves, not into the plant’s centre.
Do not mist if your room has poor air circulation. Stagnant moisture on plant surfaces is more damaging than dry air.
Pot Choice and Its Effect on Aerial Roots
The type of pot you use influences how many aerial roots your orchid will produce and how they behave.
Clear plastic pots allow roots inside the pot to photosynthesize and let you monitor root health visually without disturbing the plant. They retain moisture longer than terracotta, which suits moisture-loving epiphytes in dry climates.
Terracotta pots provide excellent airflow through their porous walls and dry out quickly mimicking the fast-draining conditions of a tree branch. They are excellent in humid climates but require more frequent watering in dry environments.
Slotted or basket pots designed specifically for orchids allow maximum airflow to roots and can dramatically reduce aerial root production, since roots inside the pot receive the air exposure they would otherwise seek outside it.
Orchid Aerial Roots vs. Monstera Aerial Roots: A Brief Comparison
Both orchids and Monsteras produce aerial roots, but they arise from entirely different evolutionary pressures and require different management responses.
Feature
Orchid Aerial Roots
Monstera Aerial Roots
Primary function
Water and nutrient absorption from air; photosynthesis
Structural anchoring to a host; secondary water uptake
Outer tissue
Velamen radicum spongy, multi-layered
Smooth to slightly rough bark-like skin; no velamen
Appearance
Silver-white when dry; green when growing or wet
Brown, cord-like, often woody at base
Can you direct them into soil?
No forcing into substrate usually causes rot
Yes Monstera roots adapt readily to soil and water
Should you cut them?
Only if dead or rotting
Can be trimmed without major harm to the plant
Number typical on a healthy plant
Several to many normal and desirable
Several often reduced by training them into substrate
Frequently Asked Questions About Orchid Aerial Roots
Should I cut orchid aerial roots that are growing outside the pot?
No, not unless they are confirmed dead or rotting. Aerial roots that are silver-white, firm, and possibly tipped with green are healthy and actively contributing to the plant’s metabolism. Cutting them weakens the plant and creates infection risk. Leave them where they are.
My orchid’s aerial roots are turning brown is this root rot?
It depends on whether the root is firm or mushy. A root that is brown but firm throughout is likely just old, slightly dehydrated, or has experienced some environmental stress it is not necessarily rotting. A root that is brown and collapses when pressed is actively decaying and should be removed with a sterile tool. Brown tips alone on otherwise healthy roots are common and do not require action.
Can I push orchid aerial roots back into the pot?
This is not recommended. Aerial roots condition themselves to atmospheric moisture and airflow. Forcing them into a closed, humid growing medium usually causes them to rot within weeks. If a root has not yet hardened if it is still actively growing and pliable it may adapt to being buried, but an established aerial root will not. It is far safer to let aerial roots remain above the potting medium.
Why does my orchid have so many aerial roots all of a sudden?
A sudden increase in aerial roots usually means one of two things: the plant is in excellent health and growing vigorously (positive), or the potting medium inside the pot has broken down and roots are escaping to find better-aerated conditions (negative). Check the medium. If the bark or moss has turned black, soggy, or has decomposed into fine particles, it is time to repot. If the medium looks healthy and your plant is producing new leaves and flower spikes, the aerial roots are simply a sign of a thriving plant.
Should I water or mist my orchid’s aerial roots?
Yes, but with important caveats. Misting aerial roots in the morning helps maintain the humidity they need, and it is especially beneficial in dry climates. The velamen will absorb atmospheric moisture effectively. What you must avoid is misting in the evening (roots stay wet through cooler night temperatures, increasing rot risk) or directing mist into the crown of the plant. During regular watering, running water over aerial roots is beneficial the velamen will absorb what it needs and excess water will drain away.